Master Bath Renovation Reveal!

Ready to see how our dated 1990’s bathroom looks with a complete renovation! I’m so excited to show you our brand new master bath, as well as share the whats and whys of the choices we made and things we might do differently if we did it again.
Update: We did do it again! We have since sold this house and moved and did another master bath renovation!
Y’all, can I just tell you that all five people in our family shared a shower in the apartment over the garage for SIX WEEKS for this renovation, but at long last it’s finished!
Before we start, let’s just remind you what we were working with when we started. (For all the the renovation backstory and process see our master bath renovation plans and what to expect during a bathroom renovation.)


Clearly I was not loving this awkward bathroom for the last three years since we moved here.
Ready for the new bathroom?


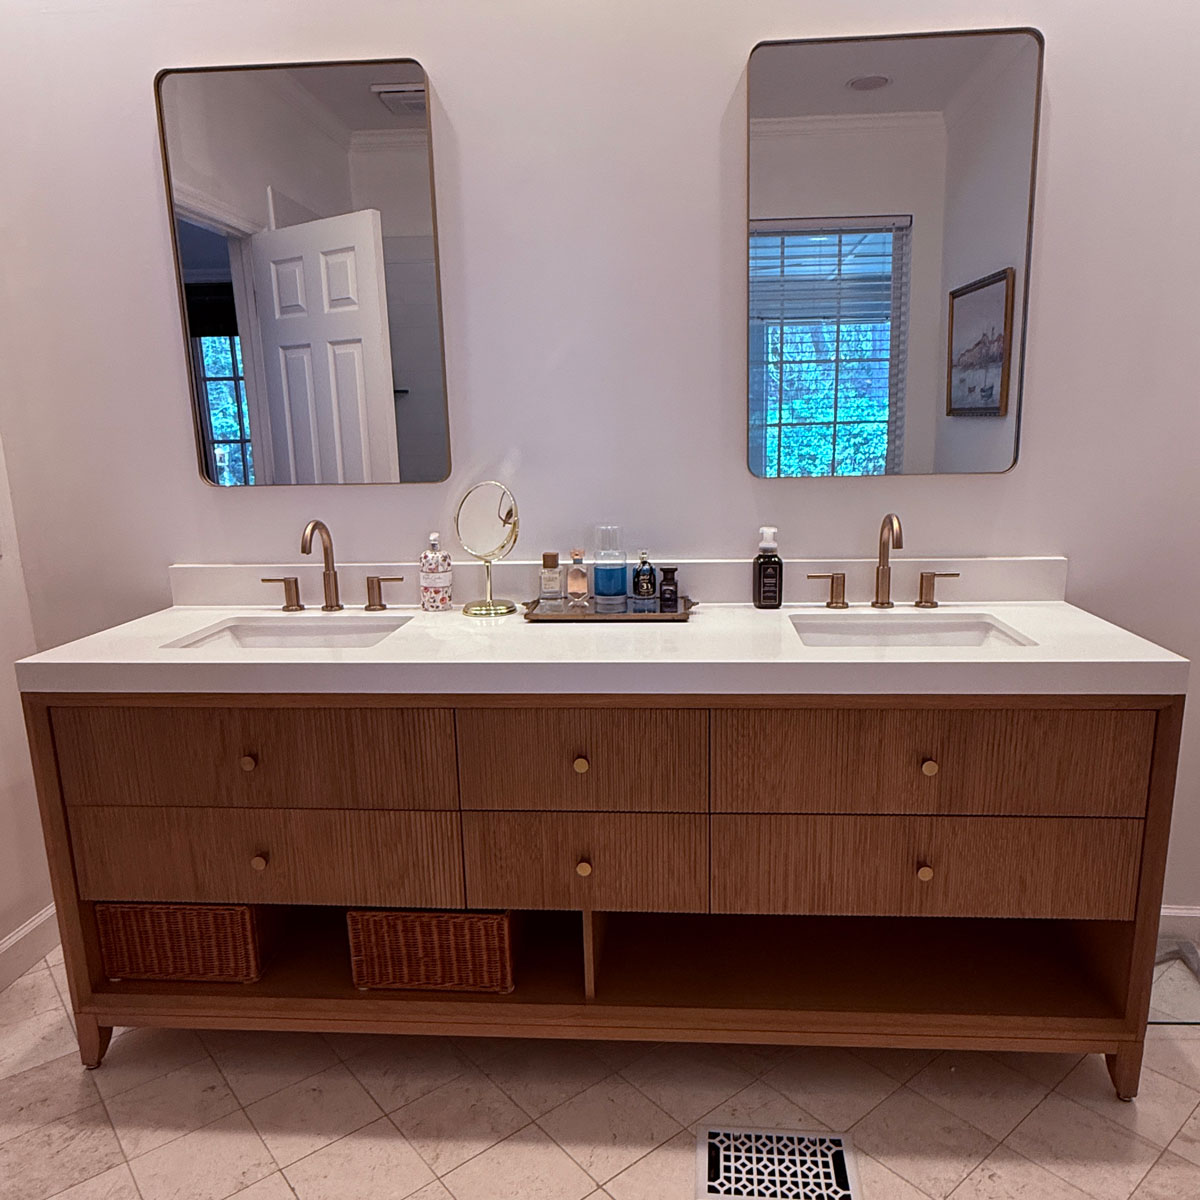
I’m in love!!!
I was nervous when we started because we weren’t moving any walls and it is truly just a weirdly shaped room. But it turned out lovely and looks so much bigger and more open without that monstroncity of a tub!
First, the flooring. Before we had carpet in the vanity area and ugly painted square tile in the toilet/shower area. We chose matte marble-look porcelain. It is SUCH a big difference! The flooring alone really brightened the entire space and made it feel so much bigger. (And a few weeks post renovation, it is so clean and easy to maintain.)

The vanity area. We kept the vanity cabinetry here but removed a bulky medicine cabinet that was on the entry wall. The countertops were replaced with white quartz (see why I love quartz and pros and cons of white quartz).

After a lot of back and forth we decided to do all gold for the fixtures. The rest of the house has black hardware but I wanted the master to be set apart and stand out. It was a challenged to find all of the fixtures in the same exact shade but I think the subtle variations work fine together.


Room Details
- SINK FAUCET: Lowe’s
- MIRRORS: Amazon
- PULLS: Lowe’s
- TUB: Lowe’s
- TUB FAUCET: Home Depot
- SHOWER FIXTURE: Home Depot
- SHOWER DRAIN: Home Depot
- BATH MAT: Amazon

And the best part…the giant ugly tub is gone!
Side note, I only tried the old tub once and was soaking in it when my husband walked over and turned on the jets and all this gunk came out! I hopped out of that tub so fast! 🤢
We chose a stand-alone tub and our contractor suggested we push it as far as we could towards the wall to maximize space for the shower. I am very grateful for his suggestion because if I had done a faucet on the side of the tub it (I was in love with this standalone faucet) it would have been farther from the wall and made the shower smaller and more closed in.

When the contractors were installing the tub there was fear that the waterfall faucet wouldn’t stick out far enough from the wall to make it in the tub, but once installed everything worked perfectly. (The tub was one of the last things to go in so we had some suspense.)
The shower is my favorite part though. I fell in love with this tile as soon as I saw it. I showed my inspiration picture from the Floor and Decor website to our tiler and he made it happen! Stacked this way it reminds me of bamboo.

My husband really wanted the shower to be amazing. As I mentioned in the planning post, our previous shower had been broken for a year, stuck at the highest temperature setting possible, causing us to have to turn the entire house water heater down in order not to scald ourselves. It was a bit ridiculous to live in this beautiful house with a janky shower.
We chose a three-showerhead unit. I like the handheld showerhead and my husband loves a rain shower (I dislike water splashing in my face and getting in my eyes with my contacts.)
Our old shower had wall jets but each had its own individual hole in the cultured marble and we wanted the least amount of cutting into the tile possible so we chose one control unit.
I love the shower because it has buttons for each sprayer and you can use one, two, or all three at the same time. The dial lets you adjust the temperature of the water (and we were able to turn our water heater back up!!)

I mentioned in our planning post, the shower glass was custom so it could not be measured until the shower was tiled, then took 3 weeks to fabricate and install. This is what took our 3-week renovation timeline into actually 6 weeks without showers.
We also opted for Showerguard on the glass for ease of cleaning, so I will have to report back in a few months to let you know my thoughts on that.
Update: I opted not to get the Showerguard for our latest bathroom renovation at our new home and instead treated it with this glass treatment instead that was recommended by the glass company and have been very happy with it.
You all have to let me know what you think of the transformation in the comments below!