Tired of looking at a dated fireplace surround? It's easier than you think to learn how to tile a fireplace!

Our fireplace tile surround was looking a bit dated. It was nice enough; 12x12 tile but it lacked that pop. That update that says, “Hey, I’m classic, stylish and will endure the changing fads”. Or at least that’s what I envision our fireplace surround says now! I’m not a professional tile installer by any means, but I researched enough about how to tile a fireplace to be dangerous! I started this DIY project with a lot of enthusiasm and unrealistic expectations. (As with most of our DIYs!)

For our fireplace surround
How to Tile a Fire Place Supplies
- Wet tile saw (yes! I always love buying more tools and this was a huge help). We got ours from Home Depot-it was a good price and worked well.
- Grout saw
- Premixed mortar
- Tile spacers (2 sizes: one for the wall and one for the floor tiles)
- Scraper Tool
- Hammer (I also used a 5lb
sledge ) - Level
- Supporting boards (more on this later)
- Grout (you’ll want to pay attention to the grout you purchase for small or slightly larger grout lines. The grout will say it’s for ¼” or ⅛” grout)
- Grout float
- Tiles
- Knee pads (or something soft to take some of the pain off your knees)
- Safety glasses
How to Tile a Fireplace Surround (Step by Step)
Step 1: Assess
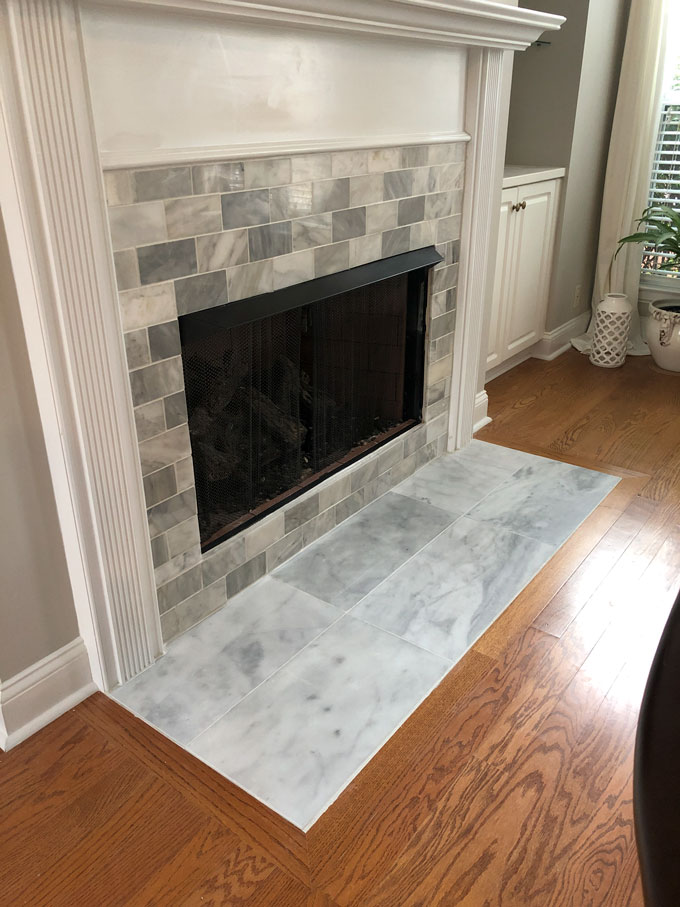
Assess the project. Take your measurements for what size of tile you want to install and the pattern you want to use. (We used 3”x5” natural marble subway tile for the wall and large 24”x12” natural marble tile for the floor).
Put painters tape on the surrounding hardwood floor and mantel-this will save you detailed repair
See a full video of our tiling process below and/or read on for more details:
You might also like how we lowered a breakfast bar, how to paint cabinets, and how to strip paint.

Step 2: Demolition
This is the time to release your pent up aggression! Removing the existing tile was tough. We did it all by hand, which was a huge pain and took much longer than I had initially planned.
If I could do it again I would rent a small jackhammer and save my arms/hands and back A LOT of pain. However, I chose to go the cheaper, manual way. I took a manual grout remover and scored a place in-between two large, floor tiles.
Once through the grout to the concrete underneath I took a masonry chisel and hammered at an angle to separate the tile from the mortar. This broke me off and it didn’t work well. In fact, I broke the masonry chisel after only an hour or so. However, a crow bar and a sledge hammer proved much more efficient.
Once I removed all of the old floor tiles I was left with the mortar to clean up. I used chisels and paint scrapers to removed the old mortar. In some areas I ended up using a Dremel tool. It was a long, tiring process.

Step 3: Preparation
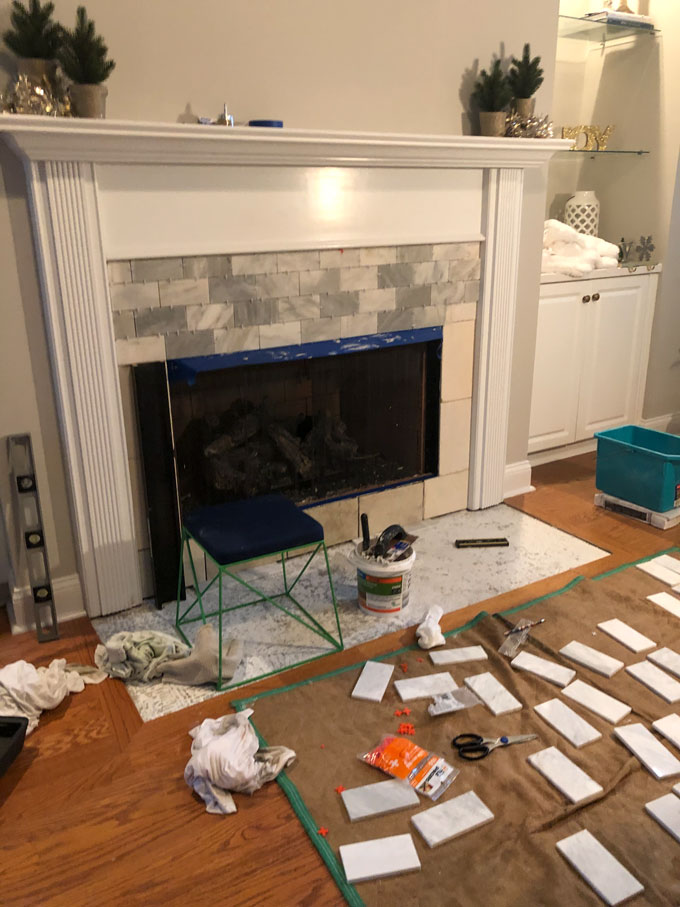
Once you’ve removed the old tile and mortar it’s time to prepare the site. After you’ve selected the tile you want to use for both the wall and floor you’ll want to lay out all of the tiles on a blanket so you can see the different colors of the tile in the same room as the fireplace (having the same light for the preparation as the installation gave me a better idea of what it would look like finished).
Natural tile will have lighter and darker tones throughout. Laying out the tiles will help you see those areas and place the tiles accordingly so you’re not putting all light colors in one area of the surround. It will also give you a chance to see which tiles are damaged so you can set those aside for use at smaller tile locations in the project.
You’ll also want to vacuum and clean the concrete floor now that the mortar is fully gone to ensure the mortar will stick appropriately. Since we placed tile over the wall tile I prepared those tiles by sanding them and then using mineral spirits to remove any dust from the existing tiles.
About this point I felt the project might never be completed the way I had hoped. The destruction portion had lasted quite a bit longer than I had initially planned on and with work and our normal lives I felt a bit down. The good news is that the worst should be behind you. Stay the course and you’ll love (hopefully) the finished job.
With the tiles laid out, site prepared it is time to get this project going!

Step 4: Installation
We started at the top of the fireplace in the center. After measuring several times to make sure it was correct we marked a center line from the top of the fireplace up right on the existing tiles. The first tile will be placed with the centerline running exactly through the center of the tile.
Apply mortar to the area (ensure you can see the center line above the applied mortar) and place the first tile. Work your way to each side placing the tiles on the wall and applying more mortar to the wall. Once you have several tiles in place check the level of your work and place the spacers. We wanted a very small grout line to make it look clean. Once you reach the side of the fireplace surround it will be time for your first wet tile cutting.
*I strongly recommend you read the wet saw instructions prior to installation. I planned on having extra tile as I figured I would end up breaking some or cutting incorrectly and I was right. You’ll get better as you go. Also, with natural stone I recommend keeping the unpolished side down while cutting so you don’t scratch the stone.
Once you get the first row done you’ll want to go back to the centerpiece to start your second row. Now off set the center tile so you are making more of a subway tile pattern. Continue to apply mortar, tiles, and spacers as you work left and right on that second row.
Once we tiled above the fireplace opening we stopped for the night. My wife, Melissa, was choosing which tiles to install to ensure we were spreading out the shades of the natural stone and helping me check the level of the project. We propped up the new tile with wood by wedging supporting wood blocks between the floor and the tile to ensure the tiles stayed level while they dried.

The next day we tackled the sides of the surround. We started at the top and worked our way down. Since this area is much smaller than above the fireplace we staggered the sizes of the tiles to ensure it retained the subway pattern style. After we had finished both sides we again propped up the tile work to let it dry overnight.
Now it was time to install the large floor tiles. I was a little nervous because I hadn’t purchased any overage of the large marble floor tiles. I had to do some tile cutting and if I broke a tile the wrong way it was going to involve a run to the store (again). Luckily it worked out fine! {whew!}

With the large floor
The tiles that go under the mantel were the hardest because they required multiple trips to the wet saw to ensure I only cut what had to be removed without ruining the tile. Pack some extra patience here.
When one side wouldn’t fit properly I used a Dremel tool to sand the mantel. Of course the mantel started smoking but I was ready to be done with the project (not enough patience and pretty tired at this point).
Melissa casually asked if I thought I should not burn the house down to which I laughed and stopped sanding/burning the mantel. If your tiles are next to hardwood floors (or other natural products) ensure you leave a larger grout line to allow for the natural expansion and contraction.

With the floor pieces complete I turned my attention back to the wall and the small space below the fireplace. Again, I started in the center of the fireplace and installed the two rows of tile working top to bottom in a subway pattern.
Once all of the tile was installed I sat back and tried to ignore the pain in my hands and back. Instead I was cautiously optimistic that this might actually turn out all right. We let it cure for the next 24 hours. (I recommend you read the instructions on the mortar you chose to ensure you let it cure properly).
Step 5: Grouting
Now it’s time to apply the grout. We chose a very light grout meant for small grout lines. There wasn’t sand in our grout, as you’ll notice on most floor grouts. After mixing the grout I started applying on the wall first working from the center out.
I had some paper towels and rags around to help clean up any misplaced grout that happened to land on the floor, mantel or wall instead of the grout lines. It was easy to clean up this way. Once the wall was complete we moved to the floor and finished it up pretty quickly.
After letting the grout set I took a soft cloth and wiped the tiles down. It was looking great! Now just don’t step on the tiles for 24 hours while it finishes curing.
Step 6: Marvel at Your Work
That’s it! Doesn't it look eye-catching? The tile adds so much to this space compared to the old tile around the fireplace! Even though the project took much longer than I had initially expected I have a lot of pride every time I look at the fireplace. It’s nice to have some sweat equity in your home and know you have the skills, patience and will to do these projects yourself.
Helpful Hints for DIY Tiling a Fireplace Surround
- Add double the time you are initially planning for if you are going to go the manual route for tile removal. I had unrealistic expectations.
- If cost is a concern consider purchasing the project in phases. For example, we bought the tile about 4 months before we ended up starting the project because I found a good price on it.
- Lay your tiles out in the same room you are updating to ensure you see it in the same natural light. This also gives you a chance to see all of the tiles and create your desired pattern.
- Pre cut your wood support forms so that you can easily install at the end of each day so that your tiles cure in a straight line. You’ll save some time ensuring they are level.
- Leave a slightly larger grout line around the perimeter of your fireplace surround so that the wood can contract/expand.
Be sure to tag your pictures of your latest DIY project with #SoGeorgiaStyle so we can follow along with you! We would love to see how you’re doing.


[…] tile fireplace south style. source […]