
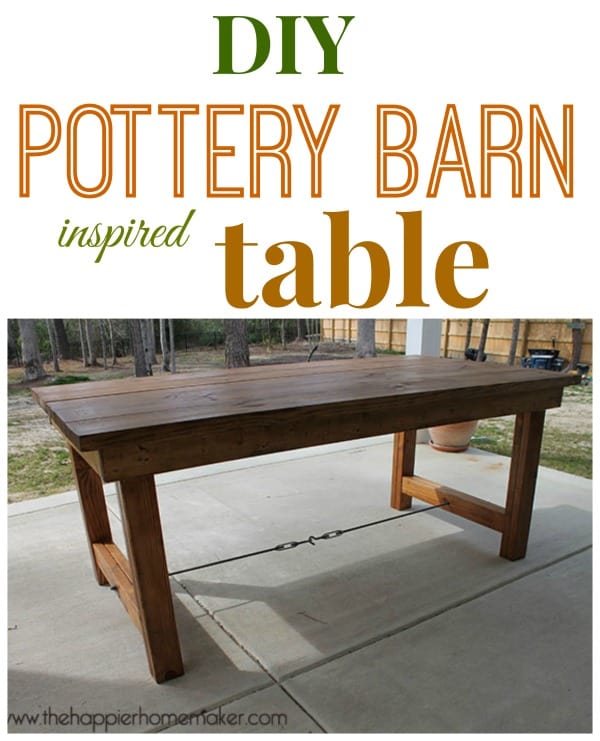
DIY Pottery Barn Inspired Dining Table
 Did you see the vintage chair I made over yesterday? Well we bought it to accent this amazing table that my husband built last weekend.

You see, we build our house last year and actually moved in last April. Shortly after moving in we decided to put in a pool which totally tore up our yard. Between the pool and then the requisite fence, our backyard was a construction zone through the end of September. We’ve been so excited to actually “live” in it this year so we’ve spent the winter dreaming up plans for the outdoors.
I posted about all the work grading and laying sod we did a few weeks ago, and we recently decided to turn the patio area into a dining area and move our patio lounge furniture to the pool area. The point of all that was that we started looking at outdoor dining tables and we quickly realized buying one was not going to happen. Even the most affordable options were going to be over $500 by time we got the minimum of six chairs we’d need. So we decided to build one. And by “we” I mean my husband Randy.
I directed Randy to the Ana White site that we used to build our headboard but he wasn’t finding his “vision” in the plans there. He was really inspired by this Pottery Barn table (which is an indoor table) so he made his own plans up using the Simple Farmhouse Table Plans from Ana White, this farmhouse table tutorial featured on Remodelaholic, and his own design.
Update! Superstar Ana White has drawn up easy plans for this DIY dining table so you can build your own!
I have to admit I was a little nervous with him making his own design so I kindof signed out of the process. He went to Lowes last week and spent $60 on the wood he needed. Then Friday I went grocery shopping and by time I got home he had framed it out already!

So I was a ~teensy~ bit impressed at this point. He works a lot and doesn’t get a lot of DIY time in recent years so I guess I had forgotten that he has some pretty great DIY skills! (A case of blog-induced DIY megalomania I guess!) He finished up the table and then handed the process over to me for finishing it up.
The first thing I did was fill all the screw holes with stainable wood putty. Then I used Minwax Wood Conditioner on the entire piece. Once that was dry I lightly sanded it and did one coat of Minwax Polyshades in Mission Oak-my favorite stain color!

Now the table just needed the finishing touch-the turnbuckle underneath like Randy’s Pottery Barn inspiration. This proved to be a bit of a debaucle because he had wanted one large turnbuckle underneath but to do that we’d need a left hand threaded rod and apparently these are very hard to come by without special ordering it. We did not have the patience for that so we ended up using two smaller turnbuckles with hooks on the left hand threaded side and used a regular right hand threaded rod to attach it on either side of the table frame. See those rectangular washers on the outside of the frame? He actually cut those out of an old license plate! Smart man! (I gush a bit over my hubby, I kinda like him!)

All of the hardware was sprayed with Hammered Brown Rustoleum Spray Paint. If you’re going to try this make sure you get the zinc-coated hardware, the galvanzied is very difficult to spraypaint.

So there is the table. Fantastic and under $100! While all of this table building and vintage chair reupholstering was going on we had 5 other chairs getting their own little makeovers and I’ll show those to you soon! I’m so excited about our patio makeover!!
Have you started revamping your outdoor spaces this year? What do you think of our DIY table?
This table is INCREDIBLE!! I can’t believe it was made for around $100 either! I need, need, need one of these!!
The table is freaking amazing!! Love it
Thanks so much!
Wow, Melissa, what an incredible job on that table! It’s gorgeous! Kudos to your husband, who obviously has some mad skills! Thanks for sharing and am pinning!
Thanks Cindy! I’m totally forwarding your comment to my hubby-he was interested to see what my readers thought of “his” table!! Have a great day!
That’s some serious table goodness there! I love love love the hardware on it too! Can’t wait to see it all come together!
Beautiful job, looks so sturdy, and pretty!
Thanks so much Virginia! My husband tried to build it extra sturdy because with three little boys it’s going to get it’s share of wear and tear! Have a great day-thanks for stopping by!
Love love love, super love this! Tell Randy he did a great job and that the turnbuckle makes it, even if it’s not the giant one you wanted. Love the license plate idea!
Thanks so much Ashley, he’s going to love reading through these comments this evening! (Maybe it will motivate him to build me a couple more things on my list!!)
The table looks terrific! And I really like the turn-buckle. Kudos to your husband.
Thanks so much Ethan!I am loving your table Jocie posted today too-fantastic!
That is awesome. I love it. And the turnbuckle looks great. (And “blog-induced DIY megalomania” is hilarious, fyi!)
Thanks Karen! I think the turnbuckle just makes the whole thing…and I readily admit I did not know what a turnbuckle was before last week so I’ve learned something new too! 🙂
looks fabulous! and i love the stain color!!!
Thanks Jocie, it’s my favorite stain color too!
This is beautiful!
Thanks so much Heather! Have a great day!
That is incredible! I absolutely love it, you guys did a great job!
Stopping by from SITS!
Thanks so much Suzanne, and thanks for stopping by! Have a great day!
Wow- that is so amazing and inspiring! What a terrific job he did! You guys will have so much fun in the yard this summer! 🙂
I love this table. I could picture this table in my house someday. I think I just found a project for the hubs!! 😉
Thanks for sharing.
If you build one please share it with me! It was so much faster/easier than I thought it would be-go for it! 🙂
So if I wanted to make this but not 72″ would I just need to cut down on length or will it make a difference on other stuff?
This turned out great Melissa! I wish my husband could build something like this! I love the hardware you added to it for an industrial touch. Looks fabulous!
Thanks Christine, I’m so glad my husband went forward with it when I “checked out!”
That’s table is insane. I think I just might accidentally leave this post up on the laptop for my husband. 😉
*JAW DROPPED* …. HOLY MOLY. This is GORGEOUS!! I want this table in my dining room, in my bedroom, in the bathroom, on the porch, in the yard, on the roof!!! It’s ABSOLUTELY amazing! I can’t believe your hubby BUILT IT… and for under $100! What an amazing team project. I’m showing this to my hubs first thing in the morning. You’ve inspired me. We’re MAKING out own table. 😀
You’re too sweet Tiffany!!
Very nicely done. 🙂 When you know you can do it yourself, it’s really hard to convince yourself to spend the unnecessary price they want to charge for the stuff.
The table is freaking amazing!! Love it 🙂
Thanks Jeanna!!
What type of wood did you use for the surface of the table? is it just the standard rough 2×6?
Yes, my husband says he just got the standard 2×6 white cheap wood, he just picked through it to get “nice” pieces!
I love how it turned out! I am getting ready to build my own table since we can’t drop 2 grand on the ones I want : ) Pinning this!
Thanks Ashley! I was do surprised how quickly my husband built this-so worth the saved money verses buying!
This table is stunning! You did a fantastic job! I found your site from the Fun In Functional party. Now looking around!
Cynthia at https:/FeedingBig.com
Thanks so much Cynthia! I’m so glad you stopped by!
LOVE LOVE LOVE!! Tell your hub great job!!
Thanks Roxanne! My husband was so surprised how well the table went over on the blog!
Gorgeous! I would love to try an adaptation of this for a kitchen island. Thanks for sharing it!
Krista @thehappyhousie
Your table turned out wonderful. I may have to show this to my husband…. Love the turnbuckle and that it was made for outside use.
Thanks for the inspiration,
Suzanne
Pieced Pastimes
Thanks Suzanne! We love it-we’ve been having dinner outside all weekend!
In case you didn’t see it earlier, I featured this today on my blog, so stop by and grab a Featured button if you don’t already have one! https://practicallyfunctional.net/2013/04/7-creative-ideas-projects-crafts-recipes-and-more/
I am in LOVE! I am bookmarking this!
I would love it if you shared this in my Furniture/House Hacks Linky Party:
https://littlemomprairie.blogspot.com/p/blog-round-up.html
my husband and I sometimes try to do something like this, bur neither one of us know why it needs a turnbuckle. I would think a 2 by4 or something like that, as you can see we are kinda dumb when it comes to a turnbuckle.
Norma, the turnbuckle is just for decoration-not function at all!
Wonderful job! and even the price is not so high.
Thanks!
I love it! The texture of the wood is amazing! 100$ with quality would is great!
Rose
Thanks Rose!
Simply Beautiful!!
Thank you Deborah!
Melissa your take on this farmhouse table is absolutely beautiful!!! I love how you put your own twist on it! I’m begging – can we draw plans for it? I’d be so honored! Ana
Ana, I would be unbelievably honored for you to draw plans up for it!! Your site is an amazing inspiration, just let me know what you need from me! ~Melissa melissa at thehappierhomemaker dot com
What are the dimensions of this table?
Hi William-it is 72″x31″x37″. I’ll have a link to plans to build it soon.
Great, I plan to build it. How soon will you have plans for it?
It should be tomorrow William, I’ll send you the link when it’s up.
Here you go William: https://ana-white.com/2013/04/plans/happier-homemaker-farmhouse-table
What a gorgeous table! Love it. I have few questions. 1. Where did you get the turnbuckle? Is it something I can pick up a Lowes or will it need to be ordered online? 2. How weatherproof is the finish? I’d like to put this outside (I don’t have a covered area). Is there something I should use besides Poly? Or do you think that will be enough? Thanks for helping! Again love, love, love it.
We got the two turnbuckles at Lowes-the rods are int he hardware aisle and the turnbuckles are over near the hooks, etc (one aisle over in our store). We had to improvise and use two hooked together because to have a single turnbuckle you need left hand threaded rod and those are special order (and we’re not that patient!). We bought two normal threaded rods, and two turnbuckles and linked the two turnbuckles in the middle.
Oops Wendy, I forgot to answer about the weatherproofing. First, I’m no expert but we decided to use outdoor treated wood, then I used outdoor graded stain and polyurethane to finish it. There is a neat tool here you can use it may help: https://flood.com/simplify
Do you think this could be modified to become a counter height table? It’s gorgeous!
I think it very easily could Alison, just make the legs higher! Thanks!!
I looked at all your photos before clicking the link to the Pottery Barn inspiration table. Your table makes PB’s table look ugly! You do beautiful work!
Awww! You just made my evening, my husband is going to be so excited to read that, it was really his labor of love! Thanks so much!
Looks great! I did notice someone asked and I did not see an answer, how did you weather proof the table?
Hey Tim, I totally missed that part of her question! I will say that I’m no expert, learning as I go, but we used treated lumber and I used outdoor stain and polyurethane to finish it. Ours is under a covered porch as well so it really is not directly exposed to the weather.
Looks incredible! I was just looking at these tables at pottery barn, from $1000 – $2000. LOL
Can you give me the dimensions (length and size) of the threaded rods and turnbuckles? Thanks. I am so excited to build this.
Vanessa I believe they were 3/16″ by 36″. My husband cut them down to the length we needed. You can work with whatever your hardware store has as far as width, just make sure you get the corresponding nuts and washers.
Sorry forgot about the turnbuckles. They are six inch. It was the only size our store had two in stock for.
Your table looks great! I’m building one as well and right as I start finalizing plans, Ana puts yours on her site. I love the look of the turnbuckles underneath, but am trying to figure out how to determine the length and how they’re attached.
Hi Brandi,
The turnbuckles come in various lengths, we chose two about 6″ long each. The threaded rods came 36″ long. To install the hardware my husband drilled a hole through the center of the leg brace on each side just a bit larger than the diameter of the threaded rods. He then inserted one end of each threaded rod into a turnbuckle and fed the unhooked end through the hole in the wood. He hooked the turnbuckels together in the center then used a hacksaw to cut off the excess length of threaded rod. A washer (we made out of a scrap license plate) and a bolt hold it in place on the outside of the wood.
I hope that helps, if you have anymore questions please let me know!
Melissa
That was very helpful and incredibly fast. Thanks so much! 🙂
Very beautiful table, I would like to build one too but I highly doubt I could get my hubby to help, he is always working too. 🙁
Save it for a weekend project when you get time, it was much faster to build than we expected-just an afternoon!!
I actually got my husband to help me build this table now I just need to find the perfect chairs so we can start using it. Thanks for the inspiration.
That’s awesome Pearl! I’d love to see a picture!
I would love to send you a pic of it if I could figure out how to. Lol
Love the idea. I’m going to try and make it into a kitchen island. Maybe add a shelf halfway between the turnbuckle and top of table.
Thanks Warren! I’d love to see a pic of yours when you’re finished-sounds great!!
This is a fabulous project! You guys are awesome! Do you mind to tell my where to buy the hardware and how to install them? I really want to make this!
This is a fabulous project! You guys are awesome! Do you mind to tell my where to buy the hardware and how to install them? I really want to make this! Thank you!
I bought my hardware at Lowes and simply attached with screws.
I LOVE the table and the turnbuckle hardware really sets it off!! Can’t wait to do one for our patio! Thank you for sharing!!
Are the turnbuckles needed for support? They look hard to install properly?
Thank you
Hi! The turnbuckles are just for decoration, you can totally skip it if you don’t want them! (They weren’t difficult to install though!)
Thank you
Do you need the turnbuckles? My son loves hiding under the table and I thought that would be dangerous?
What is the stain color? Table looks great !!
I agree with so many others here, your table looks much nicer than PB. We bought supplies tonight and will be starting this first thing in the morning! Thanks to you and Ana fort the inspirations
That’s awesome Beth, I’d love to see a picture when you’re finished!!
Hi mates, its impressive paragraph about teachingand completely explained, keep it up all the time.
Melissa
i just finished building my farmhouse table in red cedar. now i am looking for the turnbuckle system. could you tell me where you bought yours please?
thanks
We found ours at Lowes Phillip
Great project. I would love to make this as an outdoor table but I would need to store it for winter. Would it be possible to put hinges on the legs so they would fold in? I think it would be cool if say one side/set of legs laid just on top of the the other. I don’t know if they could lay flat. More than likely to achieve that the legs would need to be shortened and that would not be good. Thank you for all the great ideas.
I’m really not sure Barb, it’s a very heavy table. Sorry not to be of more help…
What!?! This is awesome. I have been looking for tables plans for a new dining room table . Love, love,love the turnbuckles on the bottom too.
I LOVE this table! My wife and I have been looking for a new dining room table and this looks perfect! Thank you for sharing!
We love it too – the metal bar on the bottom is sweet.
I love your DIY dining table! It look so amazing and interesting. I love your DIY ideas and it even inspire me to start DIYing and consider applying for ideas to it. Thank you for inspiring me and for giving me insights too.
How do you handle wood movement in the top? If you use wood with > 6% moisture content, it will warp or twist, even when you have it attached like you suggest.
I’m going to make this for outside use and burn the wood then apply lindseed oil. I think the process is called sho shuig ban (that spelling might be off, but close enough for google).
What type of wood did you use, I want to use this outside and I was concerned about rain, moisture, etc
we used pine and restain and seal it every year or two. Over time it has warped slightly (6 years now)
This is such a beautiful table!! Thank you for sharing your plans 🤗 I also love the stain color you chose, do you mind sharing what color/brand you used?
Thanks!!